Reactive Tree using Dynamic Data

For this post I assume familiarity with Dynamic Data or at least familiarity with some of my previous posts, so for those of you who are not already familiar with dynamic data see What is dynamic data? for a brief overview.

Dynamic data has evolved over several years where each new operator has been created to overcome a necessity for a practical problem which I have been working on. It is so functionally rich I always assume that there is not a lot that it cannot do. This complacency was shaken when recently I was asked if it was possible to use Dynamic Data to convert a flat observable data stream to a fully hierarchical structure. I immediately replied yes of course without weighing up in advance what the solution could be.

I quickly identified the need for a new ‘convert a stream to a tree’ operator so I took the challenge to implement it. However the more I looked into the problem the bigger the challenge become and I started to doubt whether I could pull it off.

The complexity: Writing the operator

The contract of dynamic data guarantees any operator will reflect items which are added, updated or removed from its source collection. For this to hold true for a recursive hierarchy is an extreme challenge. For every item there has to be a node which has references to both the parent and child nodes, and these have to be maintained as changes are received. The big challenge is twofold:

  1. To ensure accurate reflection of underling data
  2. Ensure good performance

My first solution was to create a node which applied a filter to find its children and in turn each child also applied a filter to find its children. I quickly got this solution working as I was able to implement it using a combination of the existing dynamic data filter and transform operators. The code was simple but alas had poor performance as each node had to create a filter from the original cache.

My mind was melting trying to find a better solution, then I realised creating and maintaining a nested structure does not necessarily have to be so mind numbingly complex as I first suspected. The algorithm can be made easy as follows:

  1. For each item in the flat list create a cache of nodes.
  2. As each node in the cache changes look back into the cache to find the parent and add / remove from the parent accordingly
  3. The output is the cache of nodes filtered so that only nodes with no parent are included in the result

Part 1 and part 3 of this algorithm can be achieved with existing operators which left me to implement part 2 in a single iteration. This means there is absolutely no need for recursion within the operator which has led to good performance.

I have called this new operator TransformToTree. It has been implemented and released on Nuget as beta version.

Herein I will illustrate how the operator is used and then walk through a working example.

The Simplicity: Create an observable tree

The following object defines an employee which has a boss id who naturally is also an employee.

public class Employee
{
    public int Id {get;set;}
    public string Name {get;set;}
    public int BossId {get;set;}
}

To transform the employee into a fully recursive tree structure you first of all need a cache of employees

var employees = new SourceCache<Employee, int>(x => x.Id)

and now to transform this into a the tree structure use the new TransformToTree operator.

var myTree = employees.TransformToTree(employee => employee.BossId);

At that is that, we have an observable tree. The resulting observable is a deeply nested node structure representing an organisational hierarchy. As the cache of employees is maintained the nodes of the tree will completely self maintain.

Do this if you need to cache the tree.

var myTreeCache = myTree.AsObservableCache();

but perhaps a more obvious example would be to display the result on a tree control on a gui.

A WPF Example

Full source code for demo here

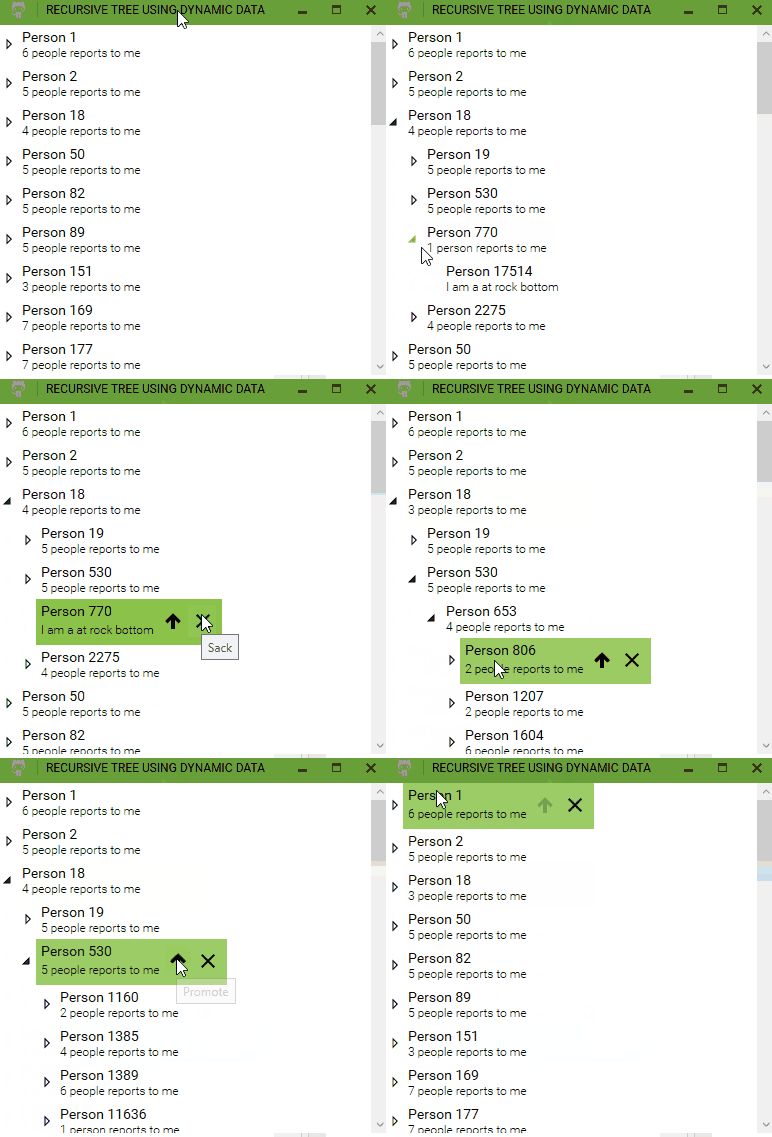
This example takes a flat hierarchy of employees, binds the nodes to a WPF TreeView and adds some buttons which change the underlying data in order to demonstrate that the tree reflects changes to the underlying data i.e. truly reactive.

Screenshot

I will not be illustrate the entire code base here as it would make this post too long. So instead I will outline what each part of the code does together with an extract of the core functionality.

Code file What does it do
MainWindow.xaml Xaml producing the view
EmployeesViewModel.cs The main view model for the example
EmployeeViewModel.cs Recursive view model for each node
EmployeeService.cs Data source for employees. Also provides methods to sack or promote employees

Most of the code in this example is boiler plate so below I will explain only the key parts of the code.

In EmployeesViewModel.cs the following code transforms the employee data into the tree structure then the second transform function takes the node which dynamic data has provided and transforms it into a xaml friendly employee view model.

var treeLoader = employeeService.Employees.Connect()
    //produce the nested tree observable
    .TransformToTree(employee => employee.BossId)
    //Transform each node into a view model
    .Transform(node => new EmployeeViewModel(node, Promote,Sack))
    .Bind(_employeeViewModels)
    .DisposeMany()
    .Subscribe();

Promote and Sack are methods which call into the employee service and change the underlying employee data. These are invoked by commands in the employee view model. I have included these actions purely to show that changing the underlying data source is reflected in the tree structure proving it is truly a reactive tree.

The employee view model is a full recursive view model. The example project loads 25,000 employees which implies there are 25,000 nodes in the tree. Clearly the tree view would struggle binding to such a large tree. To circumvent this problem the child view models are lazy loaded when the parent node is expanded. The following snippet shows how this is achieved.

public EmployeeViewModel(Node<EmployeeDto, int> node, Action promoteAction, Action sackAction, EmployeeViewModel parent = null)
{
    //.................................
    //Setting of backing fields not shown...

    //Wrap loader for the nested view model inside a lazy so we can control when it is invoked
    var childrenLoader = new Lazy(() => node.Children.Connect()
        .Transform(e => new EmployeeViewModel(e, promoteAction, sackAction,this))
        .Bind(Inferiors)
        .DisposeMany()
        .Subscribe());

    //return true when the children should be loaded
    //(i.e. if current node is a root, otherwise when the parent expands)
    var shouldExpand = node.IsRoot
         ? Observable.Return(true)
         : Parent.Value.ObservePropertyValue(This => This.IsExpanded).Value();

    //wire the observable
    var expander =shouldExpand
        .Where(isExpanded => isExpanded)
        .Take(1)
        .Subscribe(_ =>
        {
        //force lazy loading
        var x = childrenLoader.Value;
        });

    //Not all code show....
}

And that is about it. All that is left is create the xaml to bind to the a tree view. This is pretty standard xaml so I will proffer no further explanation here.

This operator and post were inspired by a question about whether dynamic data could create a hierarchy. Since then I have been asked whether I am going to expand dynamic data to include continuous aggregations and the answers is big YES. Watch this space.

Logical collection operators

I stated previously that my next post would be an illustration of how to use Dynamic Data to virtualise data (there is a Virtualise operator). Although powerful the example I had in mind just seemed too boring so I decided to put if off until I can think of a means of making the demo interesting. Instead I will unveil the logical collection operators together with what I hope you find to be a clear example.

Dynamic data can apply logical / set type operators across two or more dynamic data sources. Suppose we have the 2 dynamic data sources, sourceA and sourceB, we can apply the following logical collection operators:

Operator Syntax What gets included
Or sourceA.Or(sourceB) Items which in sourceA or sourceB
And sourceA.And(sourceB) Items which are in sourceA and sourceB
Except sourceA.Except(sourceB) Items which are in sourceA and not sourceB

The constraint is the left and right data source are of the same type. The power of dynamic data is when items get added, updated and removed in either sourceA or sourceB the result automatically updates to reflect this.

The truth is it is only occasionally that I have had the practical reason to apply the above operators but when I have I have been delighted that I took the trouble to program them in the first place as adding observers to two dynamic data sources and manually combining them to produce a third is tedious and boring code indeed.

Now for the example of when this can be useful.

Create a dynamic list of search hints

On several of the screens I have created for Dynamic Trader there is a search text box which is used to create and apply a predicate to the trades data source. For all the examples in the project it is produced using the following code.

return  trade => trade.CurrencyPair.Contains(searchText,stringComparison.OrdinalIgnoreCase) 
 ||  trade.Customer.Contains(searchText, StringComparison.OrdinalIgnoreCase);

This predicate applies to the currency pair and the customer fields so I think it would be good user experience to provide some hints to help the user understand what makes a valid search term. That’s why I have changed the text box to a combo to produce the following.

Combine 2 dynamic collections to form a list of hints

The combo box displays a list which is made up of the customers and currency pairs in the underlying dynamic data source. As the user types the list is filtered accordingly. Also as the underlying data changes, the resulting drop down list will also change accordingly. As with all examples in the demo project we have one in-memory data source which is accessed from theITradeService interface and for brevity is not show in the code below.

First we need a distinct dynamic data source of customers from the trades data source.

var customers = tradesDataSource.DistinctValues(trade => trade.Customer);

And to get a distinct dynamic data source of currency pairs from the same trades data source.

var customers = tradesDataSource.DistinctValues(trade => trade.CurrencyPair);

Both currency pair and customer are string fields so the two data sources can be combined like this

var combinedstrings = customers.Or(currencypairs)

And now we have single observable change set of currency pair and customer strings. Herein we do the standard dynamic data stuff to filter, sort and bind the result to the combo box.

//Filter the combined list according to user entered input and bind it to hints
var loader = combinedstrings
    .Filter(filter)     //filter strings using a filter controller according to user entered text
    .Sort(SortExpressionComparer<string>.Ascending(str=>str))
    .ObserveOn(schedulerProvider.MainThread)
    .Bind(_hints)       //bind to hints list
    .Subscribe();

I have skipped over a lot of detail such as filtering as I have described the process in many posts before and I did not want to obscure the crux of the example which is the Or operator. Additionally I also introduced the DistinctValues operator which I think from the above code is self explanatory.

With this example there is scope for one more powerful operator. If the result produced by the filter is large and being as the binding operation has to take place in the UI thread, you can use the Top operator to limit the number of items returned by the result set. It is applied after the sort operator.

    .Sort(SortExpressionComparer<string>.Ascending(str=>str))
    .Top(15) //limit result to a maximum of 15 items
    //....do binding

This will make the search combo responsive and non blocking even for filtering large lists. The whole example is very easy and produced in 70 lines of code. If you don’t believe me look at SearchHints.cs.

Summary

In the last post I promised to illustrate the Virtualise operator but decided against it for now, but in this short article I have shown 5 new operators which I hope will convince you that dynamic data can make life so much easier for the handling of asynchronous dynamic collections in any application.

Although the examples in this blog have mostly ended up in binding operations, I emphasise that dynamic data is for collections first and foremost whether on a mobile device, desktop or server. I have put results on the screen simply to visually show what is happening to the data. I have a few more app / binding samples in mind and after that I think I will write a purely logical example which involves no screen – perhaps the foundation of an algo-trading component.

Links to source code

Search hints object SearchHints.cs
View model of code using search hints LiveTradesViewer.cs
All examples here Dynamic trader demo on GitHub
Dynamic data Source code on Github

Dynamically Sort, Filter And Page Data

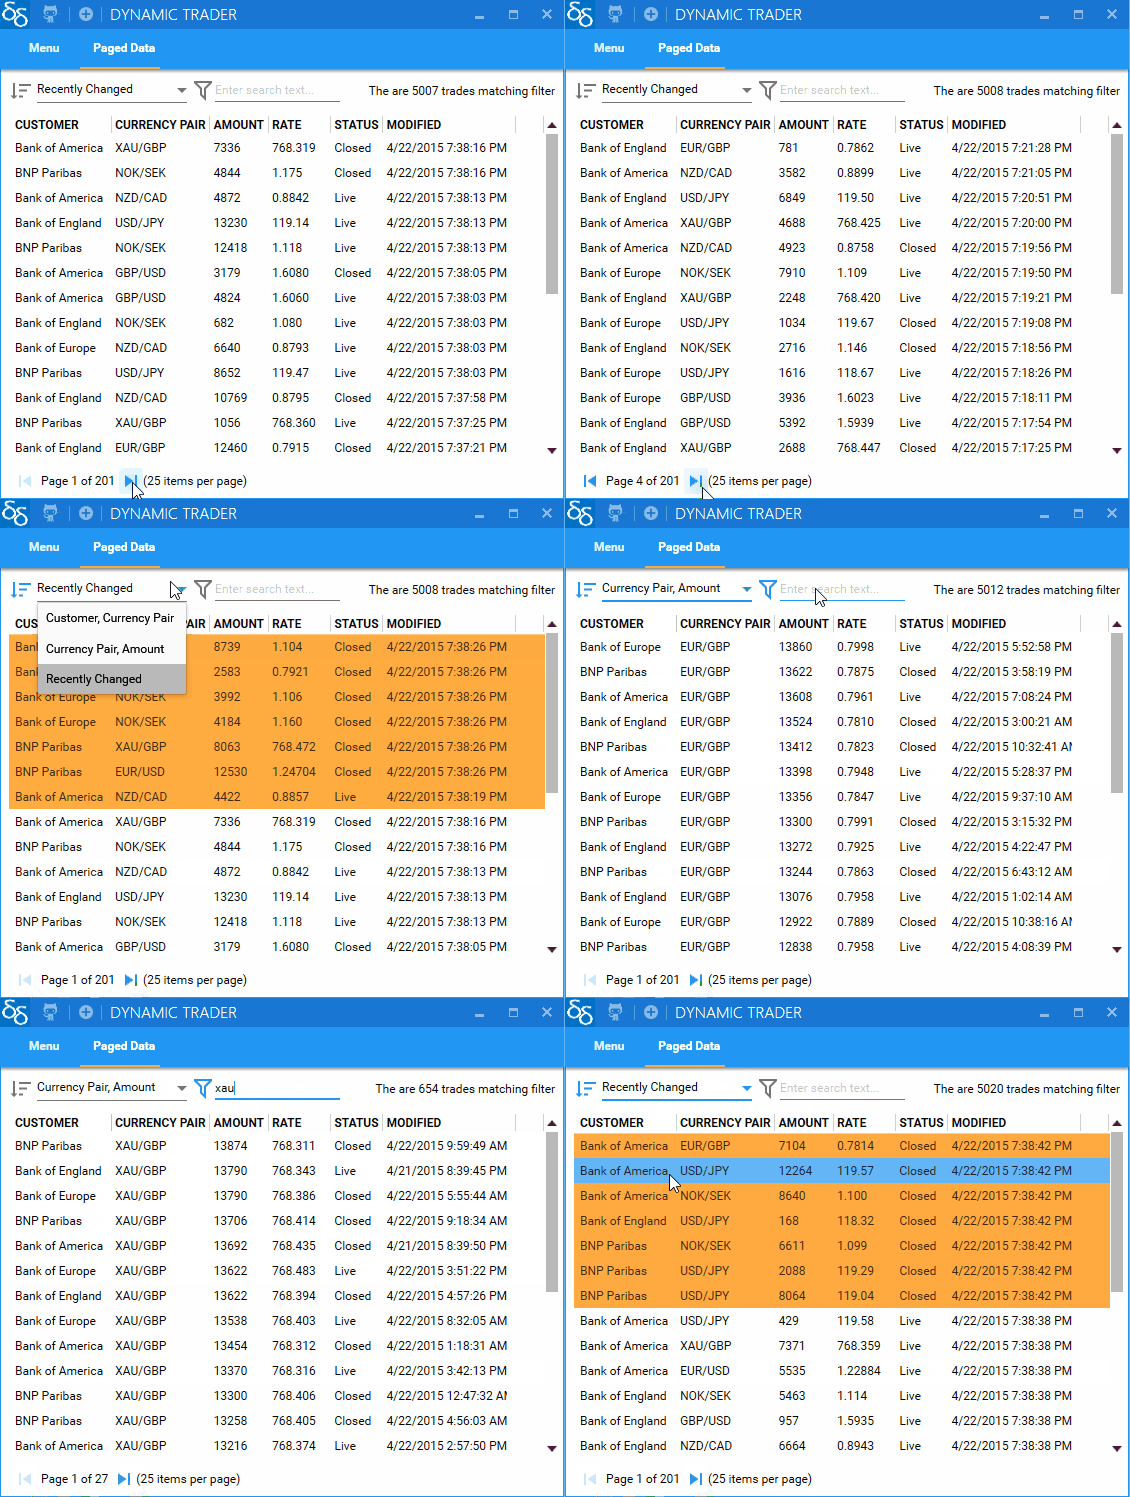
This is the first in a new series of blog where I will illustrate how dynamic data and reactive extensions can be used to improve the performance of WPF applications. Answering this question on stack overflow has prompted me to write what I plan to be a 3 part mini-series. In this part I will examine paging of in-memory data to reduce how much data a grid binds to and in subsequent posts I will illustrate virtualising data, and finally I will look at injecting behaviours into visible rows.

It has become my custom to start each post with an image then I explain how I got there. So here’s the image, it shows a screen which can filter, sort and page in-memory data.

Paging with dynamic data

If you cannot be bothered reading the remainder of this article, the demo and code can be studied via the following links

All the code is in the demo project is here Dynamic data demo project on GitHub
View model PagedDataViewer.cs
View PagedDataView.xaml
Dynamic data source code here Github

Why use paging

So the first question is why would you page data when I can simply bind to all of it? That’s a reasonable question and mostly I would say there is no need. However for large collections or collections which rapidly update the main thread can often block whilst the collection is updating. I have found this to be the case even with virtualization enabled in the xaml. This is because the observable collection can only be updated on the main thread which is clearly problematic as it blocks. Additionally the ListCollectionView may have to apply sort operations which are very expensive as the ListCollectionView has to linearly find the correct position of each item. As the collection gets larger the linear find and replace operations get slower and slower. I have found from bitter experience that binding to more than 10,000 rows in WPF can be problematic.

Actually I could go on for a while about performance bottlenecks in WPF both from the data and the xaml perspective but that is debate which we can have on another day.

There are of course many solutions to the problem but now I will concentrate of using dynamic data to create a paged view.

Create controllers to dynamically change observables

Dynamic data provides a load of extensions and some controllers to dynamically interrogate the data. For our screen we need a few controllers to dynamically filter, sort and page.

    var pageController = new PageController();  
    var filterController = new FilterController<T>(); 
    var sortController = new SortController<T>(); 

where the values can be changed like this

    //to change page
    pageController.Change(new PageRequest(1,100));
    //to change filter 
    filterController.Change(myobject=> //return a predicate);
    //to change sort
    sortController .Change( //return an IComparable<>);

Use these controller to build a filtered, sorted and paged dynamic data stream

As with all the example in this blog, the data is fed from a shared in-memory cache which is exposed through the ITradeService interface. The following code is only marginally different from code in previous posts.

    //this is an extension of observable collection optimised for dynamic data
    var collection = new ObservableCollectionExtended<TradeProxy>();

var loader = tradeService.All .Connect() 
   .Filter(filterController) // apply user filter
   .Transform(trade => new TradeProxy(trade), new ParallelisationOptions(ParallelType.Ordered, 5))
   .Sort(sortContoller, SortOptimisations.ComparesImmutableValuesOnly)
   .Page(pageController) // this applies the paging and returns on result effecting the current page
   .ObserveOn(schedulerProvider.MainThread)
    //ensure page parameters class knows which page we are on
   .Do(changes => _pageParameters.Update(changes.Response))
   .Bind(_data)     // update observable collection bindings
   .DisposeMany()   //dispose when no longer required
   .Subscribe();

In one line of code the data has been transformed, filtered, sorted and the current page is bound and reflected in the observable collection. And as if by magic the observable collection will self-maintain when any of the controller parameters change or when any of the data changes. At any time the parameters of the controllers can be changed to dynamically change the results of the current page.

The result with this small segment of code is that by applying the page operator we have significantly reduced the number of records bound to the grid and therefore reduced the work load on the main thread.

Hooray, let’s open the champagne. Almost that time, but not quite. We have not set the controller parameters yet nor have we created anything means for the user to changing the page, sort or apply a filter. For the user to enter these values I have created a couple supporting objects which are explained below.

Apply Page Changes

PageParameterData.cs is the class containing the latest page details as well as commands to move to the next and previous page. The commands are bound to the skip previous and next buttons and when these are pressed the page number property changes. This fires a notification which is observed using some simple Rx.

We observe the size and current page properties as followings.

//observe size and current page
var currentPageChanged = PageParameters.ObservePropertyValue(p => p.CurrentPage).Select(prop => prop.Value);
var pageSizeChanged = PageParameters.ObservePropertyValue(p => p.PageSize).Select(prop => prop.Value);

//combine values, create request object and change the controller.
var pageChanger = currentPageChanged.CombineLatest(pageSizeChanged,
                           (page, size) => new PageRequest(page, size))
                           .DistinctUntilChanged()
                           .Sample(TimeSpan.FromMilliseconds(100))
                           .Subscribe(pageController.Change);

The latest values of each are combined into a new PageRequest and the page controller is updated to this value. This reapplies the page logic producing a next page response which includes the next page of data.

Apply Filtering

As with several example screens in the dynamic data menu we have the SearchText property on the main view model. We observe changes, build a predicate and update the filter controller.

  var filterApplier = this.ObservePropertyValue(t => t.SearchText)
                .Throttle(TimeSpan.FromMilliseconds(250))
                .Select(propargs => BuildFilter(propargs.Value))
                .Subscribe(filterController.Change);

where the build filter function is as follows

private Func<Trade, bool> BuildFilter(string searchText)
 {
     if (string.IsNullOrEmpty(searchText)) return trade => true;
     return t => t.CurrencyPair.Contains(searchText, StringComparison.OrdinalIgnoreCase) 
                          || t.Customer.Contains(searchText, StringComparison.OrdinalIgnoreCase);
 }

Apply Sorting

SortParameterData.cs is the view model to bind the sorting data. The following code observes the selected item and applies the selected comparer to the new sort controller.

  var sortChange = SortParameters.ObservePropertyValue(t => t.SelectedItem).Select(prop=>prop.Value.Comparer)
          .ObserveOn(schedulerProvider.TaskPool)
          //Change the sort controller
          .Subscribe(sortContoller.Change);

Summary

This code is surprisingly easy with the main view model having about 100 lines of code. You probably would not believe if I said I wrote all of it in under 3 hours. Admittedly I have the infrastructure for the page changing and the sorting from another project but nonetheless I can assure you that when you are up to speed with dynamic data, you will regard the manipulation of collections of data very easy indeed.

Next time I will be doing something similar yet simpler by showing how dynamic data can virtualise data.

Log Entry Viewer Using Dynamic Data and ReactiveUI

Log Entry Viewer

In this post I show how to create a log entry viewer which uses both Dynamic Data and ReactiveUI. This example screen allows viewing, filtering and removal of log entry items from memory.

There are several features which I hope act as a good example of dynamic data, reactive ui and where reactive ui and dynamic data can compliment each other. This post is long as there is loads of explanation required yet the implementation is reasonably easy and straight forward.

All the code is in the demo project is here Dynamic data demo project on GitHub
The main view model is here LogEntryViewer.cs
The log entry service code LogEntryService.cs

Apart from some domain objects and a little xaml, the above classes consisting of a few hundred lines of code is all that is required to implement the screen. It is easy once you understand a few key concepts about dynamic data and a few key concepts about reactive ui. I hope after you read this article and gone though the code, you will think the same.

1. Create an log entry observable

We need to get a reactive log stream of log entry elements. Using Log4Net we can create a custom appender see ReactiveLogAppender.cs. The appended publishes each log entry to a static subject ISubject. This subject is exposed via a static property ReactiveLogAppender.LogEntryObservable {get;} and will be used by a service to load and manage log entries.

2. Populate an observable cache and expose as a service

There are overloads in dynamic data which convert a standard rx observable into a cache. For example you could do the following which takes the log entry observable, converts it first of all into an observable change set, then caches the result. The size limiter is optional and ensures the cache does not indefinitely grow. When the size limit is reached the oldest items are removed from the internal cache. There is also an overload for time limited expiration of items.

var logEntryCache = ReactiveLogAppender.LogEntryObservable
                     .ToObservableChangeSet(le=>le.Key,limitSizeTo: 10000) 
                     .AsObservableCache(); 

This code results in a read only observable cache. But for this example I want to expose methods to remove items, so instead I create an editable cache as follows. Since this is a cache, I have had to specify a unique key which for the log entry domain object is a counter.

var editableCache = new SourceCache<LogEntry, long>(l => l.Key);
//limit size
var sizeLimiter = editableCache.LimitSizeTo(10000).Subscribe();
//load from observable
var loader = ReactiveLogAppender.LogEntryObservable
                    .Subscribe(editableCache.AddOrUpdate);

If you want to make the cache read only, call the following method.

var readonlycache=editableCache.AsObservableCache();

For this example we will expose the cache via a service

public interface ILogEntryService
{
  IObservableCache<LogEntry, long> Items { get; }
  void Add(LogEntry items);
  void Remove(IEnumerable<LogEntry> items);
  void Remove(IEnumerable<long> keys);
}

Implementing these methods is trivial so I will not bore you will all the details of the service . The complete code is here LogEntryService.cs. This service is instantiated when the system starts as we need to catch all log entries even before the user opens the log entry view screen.

3. Create the view model, using features from both dynamic data and reactive ui

There is a lot happening in this screen so I will break it down into it’s functional parts

a) Populate a reactive list and enable user filtering

I have written extensively in previous posts about filtering and loading data into an observable collection using dynamic data observables. But to recap in dynamic data any adds, updates and removes are notified via an observable change set. Each operator is responsible for responding to a source observable, doing something and then in turn publishing it’s own change set. This way long and complicated transformation streams of data can be composed with very simple fluent and declarative code.

For the log entry example we take the data from log entry service and create an observable which processes the result and binds the data to the screen using the following code.

//this is the target list which is bound to the view
var reactiveList = new ReactiveList<LogEntryProxy>();

//a controller which allows changing a filter any time
var filter = = new FilterController<LogEntryProxy>(l => true);

 //filter, sort and populate reactive list,
var dataLoader = logEntryService.Items.Connect() //connect to the cache
     .Transform(le => new LogEntryProxy(le))     //Create a proxy
     .Filter(filter)                             //Apply a dynamic filter
     .Sort(SortExpressionComparer<LogEntryProxy>.Descending(l => l.TimeStamp))
     .ObserveOn(RxApp.MainThreadScheduler)
     .Bind(reactiveList)                          
     .DisposeMany()                              //automatic disposal
     .Subscribe();

The above code takes data from the log entry service, creates a proxy, sorts by most recent first, binds to the reactive list and finally when the proxy is finished with it is disposed.

The missing ingredient is the code to apply a filter. For this we need a string field with a 2 way binding to a view, and when it changes a new filter is build and applied.

//Binding to allow a user to to enter some text 
 public string SearchText
 {
     get { return _searchText; }
     set { this.RaiseAndSetIfChanged(ref _searchText, value); } 
 }

//using reactive ui operator to respond to any change 
var filterApplier = this.WhenAnyValue(x => x.SearchText)
                .Throttle(TimeSpan.FromMilliseconds(250))
                .Select(BuildFilter)
                .Subscribe(filter.Change); //apply predicate to filter controller

 //build the predicate
 private Func<LogEntryProxy, bool> BuildFilter(string searchText)
 {
     if (string.IsNullOrEmpty(SearchText))
         return logentry => true;

     return logentry => logentry.Message.Contains(SearchText, StringComparison.OrdinalIgnoreCase)
                     || logentry.Level.ToString().Contains(SearchText, StringComparison.OrdinalIgnoreCase);
 }

Now we have an observable list of log entry items where the user can enter some search text and the result will match the text. Not terribly exciting so far, but terribly simple!

Herein we will make the the screen more interesting and create some stuff which will give user some feed back.

b) Highlight new items

As this is a log entry view items are continually being added so the first bit of user feed back is to highlight newly added rows. The solution to this is simply achieved using reactive code made better by applying a the reactive ui ToProperty() operator. I will create a flag on the LogEntryProxy which will be used to highlight new rows for 2 seconds.

To create a reactive ui property:

//the super cool lazy backing field
 private readonly ObservableAsPropertyHelper<bool> _recent;

//which is exposed like this.
 public bool Recent  {  get { return _recent.Value; } 

and populated like this

_recent = Observable.Create<bool>(observer =>
                                {
                                    var isRecent = DateTime.Now.Subtract(original.TimeStamp).TotalSeconds < 2;
                                    if (!isRecent)   return Disposable.Empty;
                                    observer.OnNext(true);
                                    return Observable.Timer(TimeSpan.FromSeconds(2)).Select(_=>false).SubscribeSafe(observer);
                                }).ToProperty(this,lep=>lep.Recent);

Full code LogEntryProxy.cs

The power of ToProperty is it is lazy. It encapsulates a strategy which I have used for a long time to radically speed up reactive code where code is invoked only on demand, yet I had never encapsulated the concept so well. This is why it is one of my favourite parts of RXUI,

As a practical explanation, if I opened a list with 10,000 items where each row has an observable then 10,000 observables are created as part of loading the list even though a user can only see about 30 at the time. This is clearly performance and memory intensive. In the trading systems which I write each row can have dozens of observations on each proxy so only loading what is required when it is required is a very powerful strategy indeed.

The only more efficient performance and memory strategy which could be deployed is to make observables visibility aware meaning they can be hydrated and de-hydrated on demand. This requires a higher level of control i.e. some form of controller which perhaps I will write about in the future. But not now.

The resulting flag on the proxy can be used to apply a simple xaml trigger in wpf, enabling the recently added rows to be highlighted

<Style TargetType="{x:Type ListViewItem}" BasedOn="{StaticResource MetroListViewItem}">
    <Style.Triggers>
     <DataTrigger Binding="{Binding Recent}" Value="True">
             <Setter Property="Background" Value="{DynamicResource SecondaryAccentBrush}"/>
         <Setter Property="Foreground"  Value="{DynamicResource SecondaryAccentForegroundBrush}"/>   
     </DataTrigger>
    </Style.Triggers>
</Style>

I’ve got to be honest here, I have no idea how I would apply the above trigger using reactive ui binding capabilities, If anyone can let me know, then please do so,

c) Create a delete command and provide some user text

In the example, the user can delete log entry items. So we need a command which can be enabled or disabled according to whether items are selected. The starting point is I created a controller that manages which items are selected by exposing an observable collection of selected items. SelectionController.cs and it’s implementation is not part of what I am trying to illustrate so I will profer no extra explantion about it.

Knowing what items are selected enables us to build the delete command.

The first task is to convert the observable collection into a strongly typed observable change set which provides an observable of adds, updates and removes. Dynamic data provides an operator for this out of the box.

//create the selection controller. This is bound using an attached property
var selectionController = new SelectionController()

//Selected property is ObservableCollection<object>, so convert the select items into an observable change set of log entries
var selectedItems = selectionController.Selected.ToObservableChangeSet().Transform(obj => (LogEntryProxy)obj);

This observable can be directly converted into a command using a combination of dynamic data’s QueryWhenChanged operator and reactive ui’s ToCommand operator.

//make a command out of selected items, enabling the command when there is a selection 
 var deleteCommand = selectedItems
                          .QueryWhenChanged(query => query.Count > 0)
                          .ToCommand();

QueryWhenChanged exposes the inner items of the list when any change has occurred and it returns an observable of whatever data is returned. In this example query.Count>0 is a boolean so the operator returns a boolean observable which enables the command conversion.

This command can now be directly bound to a button. It will be enabled only when items are selected. However so far we are doing nothing when the command is invoked so we must subscribe to the reactive command as follows.

//Assign action when the command is invoked
 var commandInvoker =  this.WhenAnyObservable(x => x.DeleteCommand)
          .Subscribe(_ =>
          {
              //do the code to remove items from LogEntryService
          });

Just one finishing touch for the delete operation, we could do with a message tailored from the user selection. Again I will use the same QueryWhenChanged operator but this time convert the resulting string observable to a property.

var deleteItemsText = selectedItems.QueryWhenChanged(query =>
       {
           if (query.Count == 0) return "Select log entries to delete";
           if (query.Count == 1) return "Delete selected log entry?";
           return string.Format("Delete {0} log entries?", query.Count);
       })
       .StartWith("Select log entries to delete")
       .ToProperty(this, viewmodel => viewmodel.DeleteItemsText);

  //deleted items property
   public string DeleteItemsText    { get { return _deleteItemsText.Value; }   }

A simple binding to DeleteItemsText can now display the appropriate message.

d) Fade out deleted items

The next visual feedback to apply is to fade out when an item is deleted. Instead of removing an item immediately it will gradually fade out and then be removed.

Translated into code, this means each removed item needs to be delayed for a period, and upon the delay period commencing, a flag should be set on the object which will tell the view to run a fade out transition. There are many solutions to this problem but I found the most functional was to create a dynamic data based custom operator. I came up with an extension.

public static IObservable<IChangeSet<TObject, TKey>> DelayRemove<TObject, TKey>(this IObservable<IChangeSet<TObject, TKey>> source,  TimeSpan delayPeriod, Action<TObject> onDefer)
{
   if (source == null) throw new ArgumentNullException("source");
   if (onDefer == null) throw new ArgumentNullException("onDefer");

   return Observable.Create<IChangeSet<TObject, TKey>>(observer =>
   {
       var locker = new object();
       var shared = source.Publish();
       var notRemoved = shared.WhereReasonsAreNot(ChangeReason.Remove)
       .Synchronize(locker);

       var removes = shared.WhereReasonsAre(ChangeReason.Remove)
       .Do(changes => changes.Select(change => change.Current).ForEach(onDefer))
       .Delay(delayPeriod)
       .Synchronize(locker);

       var subscriber = notRemoved.Merge(removes).SubscribeSafe(observer);
       return new CompositeDisposable(subscriber, shared.Connect());

   });
}

In this operator the observable is split into 2 observables, where one part is the adds and updates and the other is the removes. The removed part has a delay applied and when delayed calls back to the consumer.

This operator can now be applied to any dynamic data observable. In our case adjust the observable which we use to load the reactive list and make a DelayRemove call.

//filter, sort and populate reactive list,
var dataLoader = logEntryService.Items.Connect()
                .DelayRemove(TimeSpan.FromSeconds(0.75),proxy =>
                      {
                          //set a property which will start a xaml fadeout storyboard
                          proxy.FlagForRemove();
                          //deselect property other selected brush will be used
                          _selectionController.DeSelect(proxy);
                      })
                 .//more operators to filter and load the list

The xaml for the delay

<Style TargetType="{x:Type ListViewItem}" BasedOn="{StaticResource MetroListViewItem}">
       <Style.Triggers>
       <DataTrigger Binding="{Binding Removing}" Value="True">
           <DataTrigger.EnterActions>
               <BeginStoryboard>
                   <Storyboard>
                       <DoubleAnimation
                               Storyboard.TargetProperty="(TextBlock.Opacity)"
                               From="1.0" To="0.1" Duration="0:0:0.75"/>
                   </Storyboard>
               </BeginStoryboard>
           </DataTrigger.EnterActions>
       </DataTrigger>
   </Style.Triggers>
 </Style>

e) Log count summary

The final feature is a summary of the log count. Yet again. There is nothing new below which has not already been explained above so all I need to say is the following code queries the log entry service and produces an aggregated summary of the different log levels.

//aggregate total items
var summariser = logEntryService.Items.Connect()
      .QueryWhenChanged(query =>
      {
          var items = query.Items.ToList();
          var debug = items.Count(le => le.Level == LogLevel.Debug);
          var info = items.Count(le => le.Level == LogLevel.Info);
          var warn = items.Count(le => le.Level == LogLevel.Warning);
          var error = items.Count(le => le.Level == LogLevel.Error);
          return new LogEntrySummary(debug, info, warn, error);
      })
      .Subscribe(s => Summary = s);

This can now be bound to display a running aggregation of the log level item counts.

4. Integrate Reactive UI into the existing sample dynamic data project

a) Use another IOC container

Reactive UI has it’s own dependency injection mechanism yet my demo application was already set up to use the marvellous structure map. You can if you wish use the built in mechanism for all your registrations but most of us have have our own favourite IOC container. Thankfully ReactiveUI accommodates our choices by exposing an API to allow use of any mechanism.

I found out how to use this API after a quick google search. This custom-structuremap-dependency-resolver-for-reactiveui-5 taught me to implement IMutableDependencyResolver and register it. However this example uses reactive ui 5 and reactive ui 6 now sits on top of Splat, so the registration takes place with Splat.

//create a structure map container
var container =  new Container(x=> x.AddRegistry<AppRegistry>());
//ReactiveUIDependencyResolver implements IMutableDependencyResolver
var resolver =  new ReactiveUIDependencyResolver(container);

//...Register views (see next section)

//register IMutableDependencyResolver
Locator.Current = resolver;

See ReactiveUIDependencyResolver.cs for implementation of IMutableDependencyResolver using structure map.

b) Set up ReactiveUI view hosting

I defer now to this excellent post A GitHub Client with WPF and ReactiveUI Part 2 for the brief and concise explanation of how views are handled using ReactiveUI’s ViewModelViewHost. It taught me everything I need to know to get up an running with the reactive ui way of doing things. Well maybe not everything but it got me off to a running start. So I will not dwell too much on details as I do not wish to replicate that post, but i will briefly explain.

ReactiveUI makes use of a view model host control ViewModelViewHost which exposes a view model dependency property. When some content is bound to the ViewModel property, the dependency resolver resolves the view which is registered via splat.

I created a control with the following definition

<reactiveUi:ViewModelViewHost ViewModel="{Binding Content}"
                        HorizontalContentAlignment="Stretch"
                        VerticalContentAlignment="Stretch"/>

For full xaml RxUiHostView.xaml
The view model which this is bound to RxUIHostViewModel.cs

In demo app, when the view model is required, it is directly resolved and bound to the above xaml. This is where reactive ui takes control. For the view model host to resolve the correct view the dependency resolver must be told what view to use for each view model. This is achieved as followings using the dependency resolver.

//register the log entry view example
resolver.Register(() => new LogEntryView(), typeof(IViewFor<LogEntryViewer>));

This has associated the view and the view model. The view must implement IViewFor which is illustrated next.

c) View to View Model Bindings

Reactive ui provides it’s own binding functionality. I am not too well versed in all of the details so I have not gone the whole hog, but for those who are interested this in the code being my view.

I have set up a few of the bindings using reactive ui bindings for illustrative purposes and the remainder I use wpf bindings.

 public partial class LogEntryView : UserControl, IViewFor<LogEntryViewer>
 {
     public LogEntryView()
     {
         InitializeComponent();

         //use wpf bindings for the data context    
         this.WhenAnyValue(x => x.ViewModel).BindTo(this, x => x.DataContext);

         //use rx ui binding for the search text box and delete command
         this.Bind(ViewModel, model => model.SearchText, view => view.SearchTextBox.Text);
         this.OneWayBind(ViewModel, model => model.DeleteCommand, view => view.DeleteButton.Command);
         //should be able to bind to a command as follows but for some reason it kept throwing, so I quickly qave up!
          //  this.BindCommand(ViewModel, model => model.DeleteCommand, view => view.DeleteButton);
     }

     public static readonly DependencyProperty ViewModelProperty = DependencyProperty.Register(
         "ViewModel", typeof (LogEntryViewer), typeof (LogEntryView), new PropertyMetadata(default(LogEntryViewer)));

     public LogEntryViewer ViewModel
     {
         get { return (LogEntryViewer) GetValue(ViewModelProperty); }
         set { SetValue(ViewModelProperty, value); }
     }

     object IViewFor.ViewModel
     {
         get { return ViewModel; }
         set { ViewModel = (LogEntryViewer)value; }
     }
 }

If anyone wants to change the bindings for this screen to completely use rx ui bindings, please be my guest. Make the changes in github and submit a pull request. Thanks!

5. That’s all folks

Both dynamic data and ReactiveUI are functionally very rich and this article only touches the surface of both but I believe the code in this example will be a good starting point for anyone wishing to find out about either of these libraries.
Trading Demo Part 5 – Aggregate Dynamic Data

This is part 5 of building a trading system series. The idea has been to take one source of rapidly changing trading data and demonstrate the range, power and simplicity of applying dynamic data operators to it. Throughout the series I have made the assumption that the reader is already familiar and comfortable with the absolutely brilliant reactive extensions framework. For those who are not I strongly recommend to check them out. There is a steep learning curve but I assure anyone that once you start thinking reactive you will never turn back. You will probably wonder how you ever programmed without it.

If you are new to dynamic data I suggest you first read this Getting Started and if you have not seen the previous parts they are

1. Expose the data as a service
2. Manage market data
3. Integration with the UI
4. Filter on calculated values

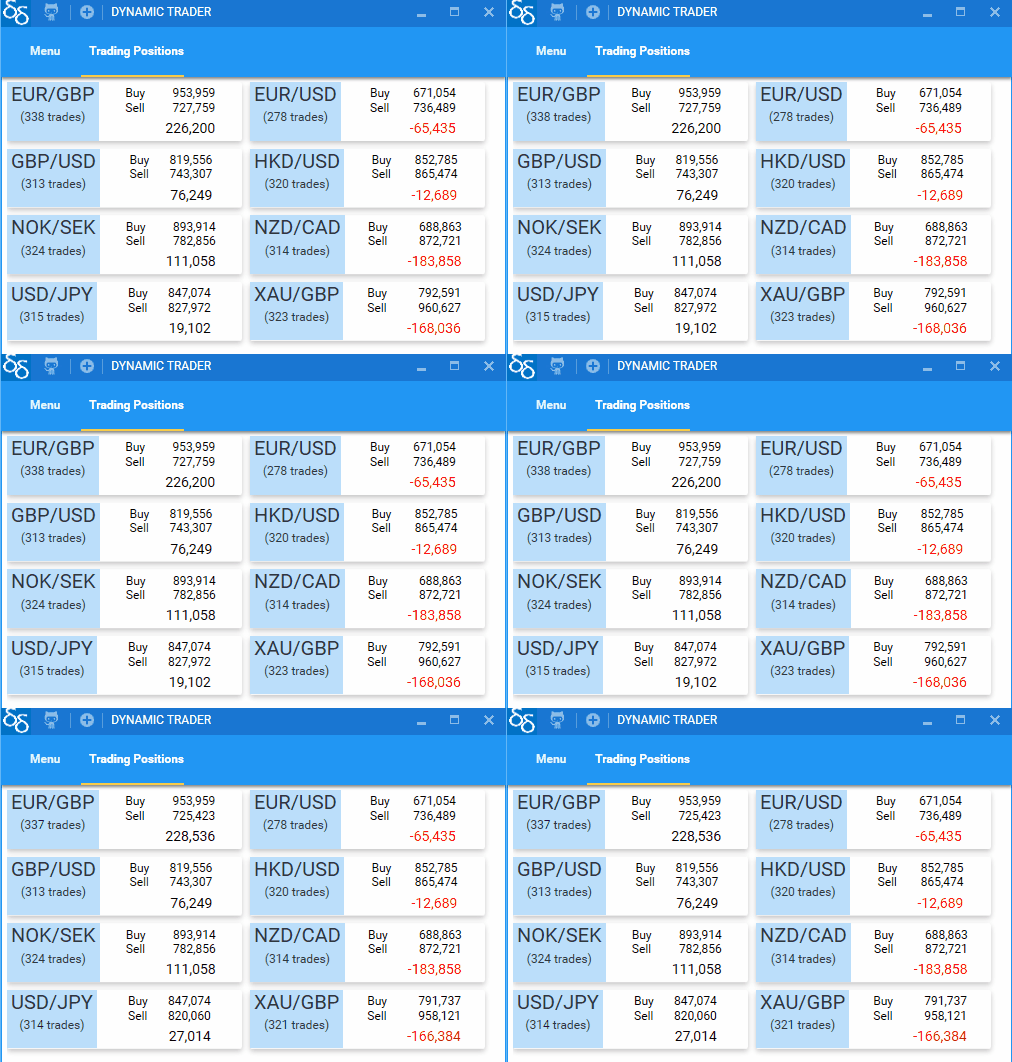
Also if you want to download the code which goes with this example, go to Trading Demo on GitHub and download and run in visual studio. Open the menu option labelled Trading Positions and you will see the following screen.

Aggregated Positions

This screen connects to the trade service data, groups by currency pair and aggregates the totals for each grouping of currency pairs. With dynamic data doing this becomes so simple with very little code involved as I am about to show.

The starting point is to group the trade data by currency pair. This is achieved using dynamic data’s Group operator.

//where tradeService is the trade service created in Part 1.
var mygroup = tradeService.Live.Connect()
                          .Group(trade => trade.CurrencyPair)

This does not look like much but the group operator is very powerful indeed. As with all things reactive, changes in the trade service are automatically propagated to the appropriate grouping. Dynamic Data extends the reactive framework by accounting for adds, updates and removes. So when trades are created, closed or amended the groups will automatically reflect these changes.

The grouping object creates a cache of each group and it’s signature is like this.

public interface IGroup<TObject, TKey, out TGroupKey>
{
    TGroupKey Key {get;}
    IObservableCache<TObject, TKey> Cache { get; }
}

Three generic types, a bit ugly I admit but we have a dynamic collection of caches, one for each item matching the group selector in the underlying data source. When grouping I almost always apply a transform function to do something with the group. In this example we want to aggregate totals for each group, so first I have created an object which accepts the grouping in it’s constructor and apply some dynamic aggregations on the cache. For this we need to use dynamic data’s Transform operator. This is akin to the standard reactive Select operator but as with several other operators in dynamic data I have to use an alternative semantic dues to ambiguous reference problems for extensions.

var transformedGroup = tradeService.Live.Connect()
                .Group(trade => trade.CurrencyPair)
                .Transform(group => new CurrencyPairPosition(group))

This means for each group we have a CurrencyPairPosition object which will be used to dynamically calculate the sum total of the buys and sells so that the overall position can be calculated. For the aggregation I have used another dynamic data operator QueryWhenChanged. The following exert illustrates it’s usage

//constructor only for illustration
public CurrencyPairPosition(IGroup<Trade, long, string> tradesByCurrencyPair)
{
    var aggregations = tradesByCurrencyPair.Cache.Connect()
                        .QueryWhenChanged(query => //query and return a result
}

For each change in the underlying cache the operator is invoked. The parameter exposes a querying API so the underling cache can be queried in a functional manner. The consumer must return a result which becomes an observable of whatever is returned. In this example we have used some standard linq to objects to calculate the buy and sell totals and return a new object which contains these values.

If we expand out the above code we easily create an observable of trade positions for each currency pair,

  var aggregations = tradesByCurrencyPair .Cache.Connect()
                       .QueryWhenChanged(query =>
                        {
                            var buy = query.Items
                                        .Where(trade => trade.BuyOrSell == BuyOrSell.Buy)
                                        .Sum(trade=>trade.Amount);
                            var sell = query.Items
                                        .Where(trade => trade.BuyOrSell == BuyOrSell.Sell)
                                        .Sum(trade => trade.Amount);
                            var count = query.Count;
                            return new TradesPosition(buy,sell,count);
                        });
                //subscribe to the result and set a property to the latest

We are at the point where we have a CurrencyPairPosition object which always reflects the latest position so the last things is to expand the consuming code so we can bind to the collection of these.

 //not all code show and _data is a derived Observable collection
  var subscriber = tradeService.Live.Connect()
                .Group(trade => trade.CurrencyPair)
                .Transform(group => new CurrencyPairPosition(group))
                .Sort(SortExpressionComparer<CurrencyPairPosition>.Ascending(t => t.CurrencyPair))
                .ObserveOn(schedulerProvider.MainThread)
                .Bind(_data)
                .DisposeMany()
                .Subscribe();

This will maintain the sorted order and ensure that CurrencyPairPosition objects are disposed when no longer required. Now a little xaml bound to the data property can produce the screen at the top of the page.

In summary, Dynamic Data makes the reactive management of collections of data very very easy indeed. If you look at the code list below, you will see just how little is involved. There are about 170 lines of code over three c# classes which also includes namespace and using declarations. And what’s even better is despite the underlying data rapidly moving, nowhere have I had to concern myself with thread safety and all the operators are completely thread-safe so long as all code functionally remains inside the operators.

The full code for all the objects is

1. PositionsViewer.cs (The view model)
2. CurrencyPairPosition.cs
3. TradesPosition.cs (the object which holds the result)
4. PositionsView.xaml (the screen)

Trading Example Part 3. Integrate with UI

This is the third part of the trading example series. If you are not already familiar with the previous parts they are, part 1 is here and part 2 here. Also a fully working demo project is here. Since publishing part 2 I have embellished the sample code to make it look more production like so if you previously downloaded it I suggest you download it again.

So far we have created a trade service and a job which updates the market prices. Now I am going to demonstrate how dynamic data can help to present the data onto a WPF screen.

There are few ingredients we need to throw into the mix:

  1. A filter controller as I want the user to be able to search for trades by entering some text.
  2. A proxy to the Trade object as the market price changes and WPF requires an INotifyPropertyChanged invocation.
  3. An observable collection so the screen can be updated with changed items,

The filter controller  which is used to reapply filters within a dynamic stream  is constructed this

private readonly FilterController<Trade> _filter = new FilterController<Trade>();

I recommend using the dynamic data  version of  observable collection

  private readonly IObservableCollection<TradeProxy> _data = new ObservableCollectionExtended<TradeProxy>();        

which is optimised for binding dynamic streams. If however you choose to use the standard observable collection or the one provided by ReactiveUI, you can but will have to write you own operator to update the bindings. I will discuss how to in a future post.

Finally we need a simple proxy of the trade object.

public class TradeProxy:AbstractNotifyPropertyChanged, IDisposable, IEquatable<TradeProxy>;
 {
    private readonly Trade _trade;
    private readonly IDisposable _cleanUp;

    public TradeProxy(Trade trade)
    {
    _trade = trade;

    //market price changed is a observable on the trade object
    _cleanUp = trade.MarketPriceChanged
                     .Subscribe(_ =>; OnPropertyChanged("MarketPrice"));
    }

 public decimal MarketPrice
 {
      get { return _trade.MarketPrice; }
 }

 // additional members below (not show)

With these elements in place we can now easily get data from the trade service, filter it, convert it to a proxy, bind to an observable collection and dispose the proxy when it is no longer required.

            var loader = tradeService.Trades
                .Connect(trade => trade.Status == TradeStatus.Live) //prefilter live trades only
                .Filter(_filter) // apply user filter
                .Transform(trade => new TradeProxy(trade))
                .Sort(SortExpressionComparer<TradeProxy>.Descending(t => t.Timestamp),SortOptimisations.ComparesImmutableValuesOnly)
                .ObserveOnDispatcher()
                .Bind(_data)   // update observable collection bindings
                .DisposeMany() //since TradeProxy is disposable dispose when no longer required
                .Subscribe();

The only missing code is to apply a user entered filter. It looks something like this:

 var filterApplier =//..watch for changes to the search text bindings
 .Sample(TimeSpan.FromMilliseconds(250))
 .Subscribe(_ =>  {
                     Func<Trade,bool> predicate= //build search predicate;
                     _filter.Change(predicate);
                  }
            );

I will not explain the xaml required as this is beyond dynamic data. But a few lines of xaml bound to the result of observable collection can give this.
Live trades 3

Was that easy? Take a look at the source code LiveTradesViewer.cs. 80 lines of code including white space.

All I say now is don’t tell your boss that you can do all this in a few lines of code otherwise you may have a pay cut!